Previously, I wrote an article about Dynamic Domain Name System using Alibaba Cloud’s API. Recently, I transferred the domain to Cloudflare and recorded how to use Cloudflare’s API for Dynamic Domain Name System.
Motivation
In previous articles, I mentioned that due to work reasons, I often need to use ssh to log into personal computers at home and in the office. However, these computers generally do not have a fixed IP address, so when the IP address changes, it is often impossible to connect to the computer in time. Therefore, I considered using a domain name instead of an IP address to access these computers and purchased one or two inexpensive domains. For a long time, I used Alibaba Cloud’s domain resolution service. You can refer to the article “Establishing a Personal Website (Part 1): Purchasing a Personal Domain and Configuring Dynamic Domain Name System” for more information on dynamic domain name resolution on Alibaba Cloud.
Later, I transferred the domain to Cloudflare, mainly because Cloudflare’s CDN service and DNS resolution speed are faster than Alibaba Cloud. Now, I will record how to use Cloudflare’s API for dynamic domain name resolution.
Prerequisites
-
Own a Domain Name
- The purchased domain name can be resolved on Cloudflare.
- If you do not have your own domain name, you can purchase an inexpensive domain from Namecheap.
-
Have a Cloudflare Account
- If you do not have a Cloudflare account, you can register for one at Cloudflare.
- After registration, log in to your Cloudflare account, add your domain, and point the domain’s DNS servers to the ones provided by Cloudflare.
Domain Resolution to Server IP Address
- The purchased domain name needs to be resolved to the server’s IP address in order to access the server directly via the domain name.
- If the server has a fixed IP address, you only need to bind the domain to the server on Cloudflare.
- If the server does not have a fixed IP address, you need to dynamically resolve the domain to the server’s IP address.
Fixed IP - Direct Binding
-
Obtain IP Address
-
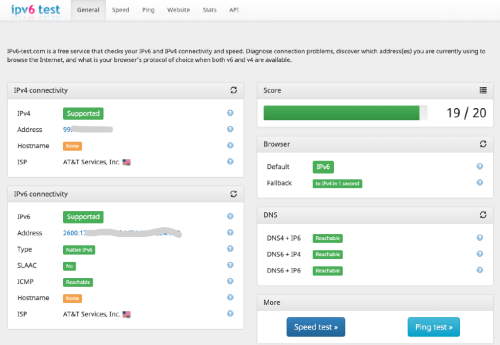
You can visit the IPv6 Test Website to check if your network supports IPv6:
-
If you are using a Unix-like system, you can obtain the IPv4 address with the following command:
1curl ipinfo.io/ipYou can obtain the IPv6 address with the following command:
1curl ipv6.icanhazip.com
-
-
Bind Domain Name to IP Address
- Log in to your Cloudflare account, click on the menu in the upper left corner, and find the DNS option in the menu:

- Click the Add Record button to add an A record (IPv4) or AAAA record (IPv6) to resolve the domain name to the server’s IP address:

- Fill in the domain name to be resolved and the corresponding IP address (whether the IP address is correct or not is not important; if it is incorrect, running this script later will correct it; but the domain name must be the one you created in step 2 of “Fixed IP - Direct Binding”).
- If you have multiple domain names to resolve, you can add them yourself by referring to the above example, and both IPv4 and IPv6 are supported. Again, it is emphasized that the domain names to be resolved in this document must be the ones that have been created on Cloudflare in step 2 of “Fixed IP - Direct Binding”.
- Log in to your Cloudflare account, click on the menu in the upper left corner, and find the DNS option in the menu:
-
Test if Binding is Successful After binding, it may take up to 10 minutes for the Cloudflare DNS servers to complete the update (usually it updates immediately after submission). You can then check if the binding was successful.
- It is recommended to test using the “ping” command from another network environment
If you can ping it from the public network, the binding is successful.
1ping surface.jinli.cyou
- It is recommended to test using the “ping” command from another network environment
-
Done! After the binding is successful, you can access the server via the domain name. For example, if you need to use ssh to remotely log in to the server, you can directly use the domain name:
1ssh [email protected] -XYou can also set up NAS (Network Attached Storage) services on the server and access them via the domain name.
Dynamic Resolution After Binding for Non-Fixed IPs
If the computer or server does not have a fixed IP address, you need to first bind the current IP address on Cloudflare according to the above steps. Then monitor the local IP address, and once it changes, use the API provided by Cloudflare to upload it to the Cloudflare DNS servers and modify the originally bound IP address.
-
DDNS Script
- The DDNS (Dynamic Domain Name System) script I use is a bash script generated by ChatGPT:
 1
 2
 3
 4
 5
 6
 7
 8
 9
10
11
12
13
14
15
16
17
18
19
20
21
22
23
24
25
26
27
28
29
30
31
32
33
34
35
36
37
38
39
40
41
42
43
44
45
46
47
48
49
50
51
52
53
54
55
56
57
58
59
60
61
62
63
64
65
66
67
68
69
70
71
72
#!/bin/bash # Config API_TOKEN="your_cloudflare_api_token" ZONE_ID="your_cloudflare_zone_id" RECORDS=("host1.example.com:A" "host1.example.com:AAAA" "host2.example.com:A" "host2.example.com:AAAA") # Add as needed # Get current IPv4 and IPv6 addresses IPV4=$(curl -s https://ipv4.icanhazip.com) IPV6=$(ip -6 addr show scope global | grep inet6 | awk '{print $2}' | cut -d/ -f1 | head -n 1) if [ -z "$IPV4" ]; then echo "No IPv4 address found." else echo "Detected IPv4: $IPV4" fi if [ -z "$IPV6" ]; then echo "No IPv6 address found." else echo "Detected IPv6: $IPV6" fi # Function to update DNS record update_record() { local name="$1" local type="$2" local ip="$3" echo "Processing $type record for $name" # Get record info RECORD=$(curl -s -X GET "https://api.cloudflare.com/client/v4/zones/$ZONE_ID/dns_records?type=$type&name=$name" \ -H "Authorization: Bearer $API_TOKEN" \ -H "Content-Type: application/json") RECORD_ID=$(echo "$RECORD" | jq -r '.result[0].id') CURRENT_IP=$(echo "$RECORD" | jq -r '.result[0].content') if [ "$CURRENT_IP" == "$ip" ]; then echo " - $type is already up to date: $ip" return fi # Update the DNS record UPDATE=$(curl -s -X PUT "https://api.cloudflare.com/client/v4/zones/$ZONE_ID/dns_records/$RECORD_ID" \ -H "Authorization: Bearer $API_TOKEN" \ -H "Content-Type: application/json" \ --data "{\"type\":\"$type\",\"name\":\"$name\",\"content\":\"$ip\",\"ttl\":120,\"proxied\":false}") SUCCESS=$(echo "$UPDATE" | jq -r '.success') if [ "$SUCCESS" == "true" ]; then echo " - Updated $type record to $ip" else echo " - Failed to update $type record: $UPDATE" fi } # Loop through all record names and update the specified type (A or AAAA) for record in "${RECORDS[@]}"; do # Split the record into name and type IFS=':' read -r name type <<< "$record" if [ "$type" == "A" ] && [ -n "$IPV4" ]; then update_record "$name" "A" "$IPV4" elif [ "$type" == "AAAA" ] && [ -n "$IPV6" ]; then update_record "$name" "AAAA" "$IPV6" else echo " - Skipping $type record for $name due to missing IP address." fi done- This script requires the user to specify the domain name and record type (A or AAAA) they want to resolve, in the format
domain_name:record_type, for examplehost1.example.com:A. If there are multiple domains to resolve, you can add multiple records in the script, in the formathost1.example.com:A,host2.example.com:AAAA, etc. - The script will automatically detect the current IPv4 and IPv6 addresses and update them on the Cloudflare DNS servers. The script uses the
jqcommand to parse JSON-formatted data, so you need to install thejqcommand:1sudo apt install jq - The script uses the Cloudflare API for dynamic domain resolution, so you need to generate an API Token and Zone ID on Cloudflare. Below is a brief introduction on how to obtain the API Token and Zone ID from Cloudflare. Fill in the Zone_ID into the
ZONE_IDvariable in the script above.
-
Obtain API Token and Zone ID
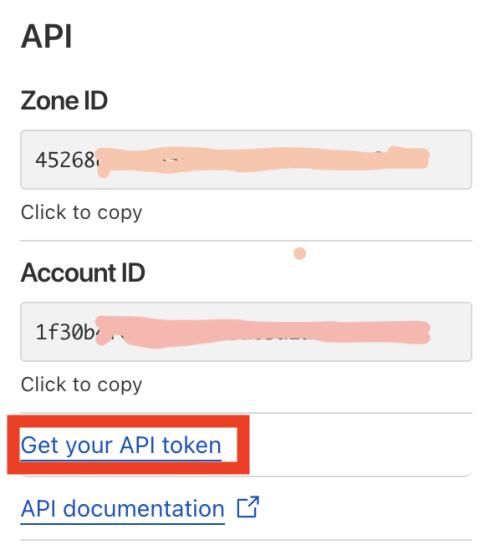
- Log in to your Cloudflare account, click on your domain, and there is a menu on the right side. The lower part of the menu has the Zone ID and Account ID. Below these two IDs is the link “Get your API token”, click it.
- On the User API Token page, select “Create Token”. Here you need to choose the type of API Token to create, select “Edit Zone DNS” type, which means this Token can only modify DNS records.
- Then you will be prompted to set the Token’s permissions, set it according to your needs:
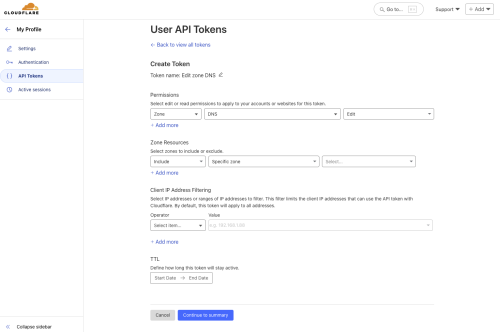
- After setting, click “Continue to summary”, and then click the “Create Token” button. Once created, the value of the Token will be displayed, and the page will also prompt you to run a curl command on the target computer to test whether the Token is valid. After testing is successful, copy the API Token and fill it into the
API_TOKENvariable in the script above.
Note: This API Token and the above Zone_ID are very important, and you must not expose them. If the API Token is leaked, you should immediately log in to your Cloudflare account and delete the Token. The Zone_ID and API Token are your credentials for operations on Cloudflare, and leaking them may lead to malicious modifications of your domain.
- Log in to your Cloudflare account, click on your domain, and there is a menu on the right side. The lower part of the menu has the Zone ID and Account ID. Below these two IDs is the link “Get your API token”, click it.
-
Test Run DDNS Script
After modifying the above script, save it as
ddns.sh. Then-
Ensure that
curlandjqcommands are installed:1sudo apt install curl jq -
Grant executable permissions to the script:
1chmod +x ddns.sh -
Run the script:
1./ddns.sh -
If the script runs successfully, it will output results similar to the following:
 1
 2
 3
 4
 5
 6
 7
 8
 9
10
Detected IPv4: 111.111.111.111 Detected IPv6: 12aa3:4567:89ab:cdef Processing A record for host1.example.com - Updated A record to 111.111.111.111 Processing AAAA record for host1.example.com - Updated AAAA record to 12aa3:4567:89ab:cdef Processing A record for host2.example.com - Updated A record to 111.111.111.111 Processing AAAA record for host2.example.com - Updated AAAA record to 12aa3:4567:89ab:cdef
-
-
Set Up Scheduled Tasks
- If the computer/server does not have a fixed IP, the IP will change after a period of time, and we need to update the IP records on the Cloudflare DNS server as soon as the IP changes.
- Manually monitoring IP changes is not very convenient, so we can have the system automatically run the DDNS script every once in a while (for example, every hour), so that we can update it within an hour after the IP changes.
- Scheduled tasks in Unix-like systems can be implemented using the system program
crontab, and you can see some methods for settingcrontabhere.
-
Linux In Linux systems, setting up
crontabscheduled tasks is very simple. We can enter the following command in the command line:shell crontab -eThis command will open a configuration file containingcrontabscheduled tasks. Add a line at the end of the file:shell 42 * * * * cd ~/.config/ddns && ./ddns.shThis means that theddns.shscript will run at the 42nd minute of every hour. You can modify the time as needed.
- After that, you can use the following command to check if the
crontabscheduled task is running:1crontab -l
- macOS
On macOS, due to the system's security considerations, some special settings are required before using the `crontab` command.

1. Grant `cron` command access to full disk:
    - Open "System Preferences" -> "Security & Privacy" -> "Privacy" tab, and click the lock icon in the lower-left corner to unlock the settings.
    - In the left list, select "Full Disk Access", then click the plus button on the right to add the `/usr/sbin/cron` program. Note that after clicking the plus button, a Finder window will pop up for you to select the program to add. However, the `cron` program is hidden by default and cannot be found directly in the Finder window. You can press `Command + Shift + G` in Finder, enter `/usr/sbin/`, and then select the `cron` program to add it.
    - Close the "System Preferences" window, ensuring that the permissions have been granted.
2. The script requires the use of commands such as `curl`, `jq`, `yq`, and `ifconfig`, but the `cron` environment does not load user environment variables when running scripts. Therefore, you need to specify the full paths to these commands in the script. You can find the full paths by running the following command:
    ```shell
    which curl jq yq ifconfig
    ```
    Then fill in the full paths of these commands in the script, for example:
    ```bash
    export PATH="$PATH:/usr/local/bin:/usr/bin:/opt/local/bin:/sbin"
    ```
3. To achieve this, I specifically wrote a script as a mediator script to call `ddns.sh`, named `cron_ddns.sh`, with the following content:
    ```bash
    #!/bin/bash

    echo "[$(date '+%Y-%m-%d %H:%M:%S')] Starting cron job for Cloudflare DDNS update..."

    export PATH="$PATH:/usr/local/bin:/usr/bin:/opt/local/bin:/sbin"
    echo "PATH is $PATH"

    cd /Users/lijin/.config/ddns
    echo "Current directory is $(pwd)"

    echo "Running script cloudflare.sh"
    /bin/bash ddns.sh
    ```
4. Grant execute permission to the script:
    ```shell
    chmod +x cron_ddns.sh
    ```
5. Then add a scheduled task in `crontab`:
    ```shell
    crontab -e
    ```
    Add a line at the end of the file:
    ```shell
    42 * * * * /Users/lijin/.config/ddns/cron_ddns.sh >> /tmp/ddns.log 2>&1
    ```