This is the third article in the “Virtual Private Network VPN” series. In the first two articles, I introduced the basic concepts and use cases of VPNs, as well as how to set up a private virtual network using Tailscale. Other articles in this series can be found at:
In the previous article, I explained how to set up a private virtual network using Tailscale. Tailscale is a VPN solution based on WireGuard that allows us to quickly create a private virtual network. However, the official version of Tailscale uses Tailscale’s control servers, meaning our data and network traffic pass through Tailscale’s servers. Although this data and traffic are encrypted, if we want complete control over our network environment or have privacy and security concerns, we can set up our own Tailscale control server. The tool to achieve this is Headscale.
A static IP address (this is very important; as mentioned in previous articles, if you don’t have a static IP, you can use Cloudflare Tunnel for reverse proxy, but Cloudflare Tunnel cannot proxy Headscale services. This issue will be discussed later, but I don’t have a solution for it.)
Headscale is an open-source implementation of a Tailscale control server that allows users to host the Tailscale control plane on their own infrastructure. By using Headscale, users can have complete control over their VPN environment without relying on Tailscale’s official servers. Its GitHub repository can be found at: headscale。
Additionally, to facilitate user management of Headscale, developers have created several web interface tools that integrate with Headscale. More details can be found at: headscale-web. I have only tried headplane and headscale-ui。headscale-ui did not run successfully, while headplane deployed successfully. Their functionalities should be similar, and I am too lazy to explore why headscale-ui didn’t work, so I just used headplane.
Headscale acts as an intermediary between Tailscale clients and servers by implementing the Tailscale control protocol. Users can configure Tailscale clients to use Headscale as the control server, allowing for complete control over VPN connections. Headscale supports all major features of Tailscale, including authentication, device registration, and network configuration.
Here, we will deploy both Headscale and Headplane services in the same Docker container. Both Headscale and Headplane require configuration files, so we will create directories to store these configuration files. The directory structure for the entire project is as follows:
The ${DATA_DIR} is an environment variable that you can define in the .env file. This variable is used to specify the directory for data storage. Here is an example of the content for the .env file:
1
DATA_DIR=/path/to/your/data
The headscale service only needs to read the headscale configuration file, while the headplane service needs to read both the headscale and headplane configuration files.
The configuration file for Headscale is located at headscale/config/config.yaml. Following is an example configuration and you can modify it according to your needs:
---# headscale will look for a configuration file named `config.yaml` (or `config.json`) in the following order:## - `/etc/headscale`# - `~/.headscale`# - current working directory# The url clients will connect to.# Typically this will be a domain like:## https://myheadscale.example.com:443#server_url:https://<headscale.example.com># Address to listen to / bind to on the server## For production:listen_addr:0.0.0.0:8080#listen_addr: 127.0.0.1:8080# Address to listen to /metrics, you may want# to keep this endpoint private to your internal# network#metrics_listen_addr:127.0.0.1:9090# Address to listen for gRPC.# gRPC is used for controlling a headscale server# remotely with the CLI# Note: Remote access _only_ works if you have# valid certificates.## For production:grpc_listen_addr:0.0.0.0:50443#grpc_listen_addr: 127.0.0.1:50443# Allow the gRPC admin interface to run in INSECURE# mode. This is not recommended as the traffic will# be unencrypted. Only enable if you know what you# are doing.grpc_allow_insecure:false# The Noise section includes specific configuration for the# TS2021 Noise protocolnoise:# The Noise private key is used to encrypt the# traffic between headscale and Tailscale clients when# using the new Noise-based protocol.private_key_path:/var/lib/headscale/noise_private.key# List of IP prefixes to allocate tailaddresses from.# Each prefix consists of either an IPv4 or IPv6 address,# and the associated prefix length, delimited by a slash.# It must be within IP ranges supported by the Tailscale# client - i.e., subnets of 100.64.0.0/10 and fd7a:115c:a1e0::/48.# See below:# IPv6: https://github.com/tailscale/tailscale/blob/22ebb25e833264f58d7c3f534a8b166894a89536/net/tsaddr/tsaddr.go#LL81C52-L81C71# IPv4: https://github.com/tailscale/tailscale/blob/22ebb25e833264f58d7c3f534a8b166894a89536/net/tsaddr/tsaddr.go#L33# Any other range is NOT supported, and it will cause unexpected issues.prefixes:v4:100.64.0.0/10v6:fd7a:115c:a1e0::/48# Strategy used for allocation of IPs to nodes, available options:# - sequential (default): assigns the next free IP from the previous given IP.# - random: assigns the next free IP from a pseudo-random IP generator (crypto/rand).allocation:sequential# DERP is a relay system that Tailscale uses when a direct# connection cannot be established.# https://tailscale.com/blog/how-tailscale-works/#encrypted-tcp-relays-derp## headscale needs a list of DERP servers that can be presented# to the clients.derp:server:# If enabled, runs the embedded DERP server and merges it into the rest of the DERP config# The Headscale server_url defined above MUST be using https, DERP requires TLS to be in placeenabled:false# Region ID to use for the embedded DERP server.# The local DERP prevails if the region ID collides with other region ID coming from# the regular DERP config.region_id:999# Region code and name are displayed in the Tailscale UI to identify a DERP regionregion_code:"headscale"region_name:"Headscale Embedded DERP"# Listens over UDP at the configured address for STUN connections - to help with NAT traversal.# When the embedded DERP server is enabled stun_listen_addr MUST be defined.## For more details on how this works, check this great article: https://tailscale.com/blog/how-tailscale-works/stun_listen_addr:"0.0.0.0:3478"# Private key used to encrypt the traffic between headscale DERP# and Tailscale clients.# The private key file will be autogenerated if it's missing.#private_key_path:/var/lib/headscale/derp_server_private.key# This flag can be used, so the DERP map entry for the embedded DERP server is not written automatically,# it enables the creation of your very own DERP map entry using a locally available file with the parameter DERP.paths# If you enable the DERP server and set this to false, it is required to add the DERP server to the DERP map using DERP.pathsautomatically_add_embedded_derp_region:true# For better connection stability (especially when using an Exit-Node and DNS is not working),# it is possible to optionally add the public IPv4 and IPv6 address to the Derp-Map using:ipv4:1.2.3.4ipv6:2001:db8::1# List of externally available DERP maps encoded in JSONurls:- https://controlplane.tailscale.com/derpmap/default# Locally available DERP map files encoded in YAML## This option is mostly interesting for people hosting# their own DERP servers:# https://tailscale.com/kb/1118/custom-derp-servers/## paths:# - /etc/headscale/derp-example.yamlpaths:[]# If enabled, a worker will be set up to periodically# refresh the given sources and update the derpmap# will be set up.auto_update_enabled:true# How often should we check for DERP updates?update_frequency:24h# Disables the automatic check for headscale updates on startupdisable_check_updates:false# Time before an inactive ephemeral node is deleted?ephemeral_node_inactivity_timeout:30mdatabase:# Database type. Available options: sqlite, postgres# Please note that using Postgres is highly discouraged as it is only supported for legacy reasons.# All new development, testing and optimisations are done with SQLite in mind.type:sqlite# Enable debug mode. This setting requires the log.level to be set to "debug" or "trace".debug:false# GORM configuration settings.gorm:# Enable prepared statements.prepare_stmt:true# Enable parameterized queries.parameterized_queries:true# Skip logging "record not found" errors.skip_err_record_not_found:true# Threshold for slow queries in milliseconds.slow_threshold:1000# SQLite configsqlite:path:/var/lib/headscale/db.sqlite# Enable WAL mode for SQLite. This is recommended for production environments.# https://www.sqlite.org/wal.htmlwrite_ahead_log:true# Maximum number of WAL file frames before the WAL file is automatically checkpointed.# https://www.sqlite.org/c3ref/wal_autocheckpoint.html# Set to 0 to disable automatic checkpointing.wal_autocheckpoint:1000# # Postgres config# Please note that using Postgres is highly discouraged as it is only supported for legacy reasons.# See database.type for more information.# postgres:# # If using a Unix socket to connect to Postgres, set the socket path in the 'host' field and leave 'port' blank.# host: localhost# port: 5432# name: headscale# user: foo# pass: bar# max_open_conns: 10# max_idle_conns: 10# conn_max_idle_time_secs: 3600# # If other 'sslmode' is required instead of 'require(true)' and 'disabled(false)', set the 'sslmode' you need# # in the 'ssl' field. Refers to https://www.postgresql.org/docs/current/libpq-ssl.html Table 34.1.# ssl: false### TLS configuration### Let's encrypt / ACME## headscale supports automatically requesting and setting up# TLS for a domain with Let's Encrypt.## URL to ACME directoryacme_url:https://acme-v02.api.letsencrypt.org/directory# Email to register with ACME provideracme_email:""# Domain name to request a TLS certificate for:tls_letsencrypt_hostname:""# Path to store certificates and metadata needed by# letsencrypt# For production:tls_letsencrypt_cache_dir:/var/lib/headscale/cache# Type of ACME challenge to use, currently supported types:# HTTP-01 or TLS-ALPN-01# See: docs/ref/tls.md for more informationtls_letsencrypt_challenge_type:HTTP-01# When HTTP-01 challenge is chosen, letsencrypt must set up a# verification endpoint, and it will be listening on:# :http = port 80tls_letsencrypt_listen:":http"## Use already defined certificates:tls_cert_path:""tls_key_path:""log:# Output formatting for logs: text or jsonformat:textlevel:info## Policy# headscale supports Tailscale's ACL policies.# Please have a look to their KB to better# understand the concepts: https://tailscale.com/kb/1018/acls/policy:# The mode can be "file" or "database" that defines# where the ACL policies are stored and read from.mode:file# If the mode is set to "file", the path to a# HuJSON file containing ACL policies.path:""## DNS## headscale supports Tailscale's DNS configuration and MagicDNS.# Please have a look to their KB to better understand the concepts:## - https://tailscale.com/kb/1054/dns/# - https://tailscale.com/kb/1081/magicdns/# - https://tailscale.com/blog/2021-09-private-dns-with-magicdns/## Please note that for the DNS configuration to have any effect,# clients must have the `--accept-dns=true` option enabled. This is the# default for the Tailscale client. This option is enabled by default# in the Tailscale client.## Setting _any_ of the configuration and `--accept-dns=true` on the# clients will integrate with the DNS manager on the client or# overwrite /etc/resolv.conf.# https://tailscale.com/kb/1235/resolv-conf## If you want stop Headscale from managing the DNS configuration# all the fields under `dns` should be set to empty values.dns:# Whether to use [MagicDNS](https://tailscale.com/kb/1081/magicdns/).magic_dns:true# Defines the base domain to create the hostnames for MagicDNS.# This domain _must_ be different from the server_url domain.# `base_domain` must be a FQDN, without the trailing dot.# The FQDN of the hosts will be# `hostname.base_domain` (e.g., _myhost.example.com_).base_domain:<hs.example.com># List of DNS servers to expose to clients.nameservers:global:- 1.1.1.1- 1.0.0.1- 2606:4700:4700::1111- 2606:4700:4700::1001# NextDNS (see https://tailscale.com/kb/1218/nextdns/).# "abc123" is example NextDNS ID, replace with yours.# - https://dns.nextdns.io/abc123# Split DNS (see https://tailscale.com/kb/1054/dns/),# a map of domains and which DNS server to use for each.split:{}# foo.bar.com:# - 1.1.1.1# darp.headscale.net:# - 1.1.1.1# - 8.8.8.8# Set custom DNS search domains. With MagicDNS enabled,# your tailnet base_domain is always the first search domain.search_domains:[]# Extra DNS records# so far only A and AAAA records are supported (on the tailscale side)# See: docs/ref/dns.mdextra_records:[]# - name: "grafana.myvpn.example.com"# type: "A"# value: "100.64.0.3"## # you can also put it in one line# - { name: "prometheus.myvpn.example.com", type: "A", value: "100.64.0.3" }## Alternatively, extra DNS records can be loaded from a JSON file.# Headscale processes this file on each change.# extra_records_path: /var/lib/headscale/extra-records.json# Unix socket used for the CLI to connect without authentication# Note: for production you will want to set this to something like:unix_socket:/var/run/headscale/headscale.sockunix_socket_permission:"0770"## headscale supports experimental OpenID connect support,# it is still being tested and might have some bugs, please# help us test it.# OpenID Connectoidc:only_start_if_oidc_is_available:trueissuer:"https://your-oidc.issuer.com/path"client_id:"your-oidc-client-id"client_secret:"your-oidc-client-secret"# Alternatively, set `client_secret_path` to read the secret from the file.# It resolves environment variables, making integration to systemd's# `LoadCredential` straightforward:# client_secret_path: "${CREDENTIALS_DIRECTORY}/oidc_client_secret"# # client_secret and client_secret_path are mutually exclusive.# The amount of time from a node is authenticated with OpenID until it# expires and needs to reauthenticate.# Setting the value to "0" will mean no expiry.expiry:180d# Use the expiry from the token received from OpenID when the user logged# in, this will typically lead to frequent need to reauthenticate and should# only been enabled if you know what you are doing.# Note: enabling this will cause `oidc.expiry` to be ignored.use_expiry_from_token:false# Customize the scopes used in the OIDC flow, defaults to "openid", "profile" and "email" and add custom query# parameters to the Authorize Endpoint request. Scopes default to "openid", "profile" and "email".scope:["openid","profile","email"]# extra_params:# domain_hint: example.com## # List allowed principal domains and/or users. If an authenticated user's domain is not in this list, the# # authentication request will be rejected.## allowed_domains:# - example.com# # Note: Groups from keycloak have a leading '/'# allowed_groups:# - /headscale# allowed_users:# - [email protected]## # Optional: PKCE (Proof Key for Code Exchange) configuration# # PKCE adds an additional layer of security to the OAuth 2.0 authorization code flow# # by preventing authorization code interception attacks# # See https://datatracker.ietf.org/doc/html/rfc7636# pkce:# # Enable or disable PKCE support (default: false)# enabled: false# # PKCE method to use:# # - plain: Use plain code verifier# # - S256: Use SHA256 hashed code verifier (default, recommended)# method: S256## # Map legacy users from pre-0.24.0 versions of headscale to the new OIDC users# # by taking the username from the legacy user and matching it with the username# # provided by the OIDC. This is useful when migrating from legacy users to OIDC# # to force them using the unique identifier from the OIDC and to give them a# # proper display name and picture if available.# # Note that this will only work if the username from the legacy user is the same# # and there is a possibility for account takeover should a username have changed# # with the provider.# # When this feature is disabled, it will cause all new logins to be created as new users.# # Note this option will be removed in the future and should be set to false# # on all new installations, or when all users have logged in with OIDC once.# map_legacy_users: false# Logtail configuration# Logtail is Tailscales logging and auditing infrastructure, it allows the control panel# to instruct tailscale nodes to log their activity to a remote server.logtail:# Enable logtail for this headscales clients.# As there is currently no support for overriding the log server in headscale, this is# disabled by default. Enabling this will make your clients send logs to Tailscale Inc.enabled:false# Enabling this option makes devices prefer a random port for WireGuard traffic over the# default static port 41641. This option is intended as a workaround for some buggy# firewall devices. See https://tailscale.com/kb/1181/firewalls/ for more information.randomize_client_port:false
server:host:"0.0.0.0"port:3000cookie_secret:"32-character-long-random-string"cookie_secure:falseheadscale:url:"https://<headscale.example.com>"config_path:"/etc/headscale/config.yaml"config_strict:trueintegration:docker:enabled:truecontainer_name:"headscale"socket:"unix:///var/run/docker.sock"oidc:issuer:"https://<authelia.example.com>"client_id:"headplane"# The client secret for the OIDC client# Either this or `client_secret_path` must be set for OIDC to workclient_secret:"some-random-client-secret"# You can alternatively set `client_secret_path` to read the secret from disk.# The path specified can resolve environment variables, making integration# with systemd's `LoadCredential` straightforward:# client_secret_path: "${CREDENTIALS_DIRECTORY}/oidc_client_secret"disable_api_key_login:falsetoken_endpoint_auth_method:"client_secret_post"# If you are using OIDC, you need to generate an API key# that can be used to authenticate other sessions when signing in.## This can be done with `headscale apikeys create --expiration 999d`headscale_api_key:"your-headscale-api-key"# Optional, but highly recommended otherwise Headplane# will attempt to automatically guess this from the issuer## This should point to your publicly accessibly URL# for your Headplane instance with /admin/oidc/callbackredirect_uri:'https://<url-to-your-headplane>/admin/oidc/callback'# Stores the users and their permissions for Headplane# This is a path to a JSON file, default is specified below.user_storage_file:"/var/lib/headplane/users.json"
In the above configuration, Headplane uses OIDC (OpenID Connect) for authentication. You can use Authelia as the OIDC provider.
If you haven’t set up Authelia yet, you can refer to my previous article on [Authentication: Deploying Authelia for Private Identity Service]({{ <relref “../authelia/index.en.md”> }}) for a detailed guide on how to set it up.
The configuration file for Authelia is usually located at /etc/authelia/configuration.yml, and you need to add an OIDC client configuration in it. Below is an example configuration:
After creating the above files, you can start the Headscale and Headplane services using the following command:
1
docker-compose up -d
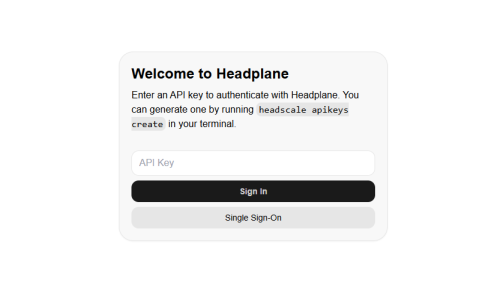
If everything is set up correctly, you should be able to access the Headplane web interface through your browser at http://<your-server-ip>:3000/admin/. Note that the /admin/ path is very important; if you don’t include it, you will see a 404 error page. You should see a login interface like this:
If you haven’t configured OIDC authentication, you won’t see the Single Sign On option on the above page. You can log in directly using the Headscale API key. You can create an API key through the command line interface of the Headscale container with the following command:
This will generate an API key that you can use to log in to the Headplane interface.
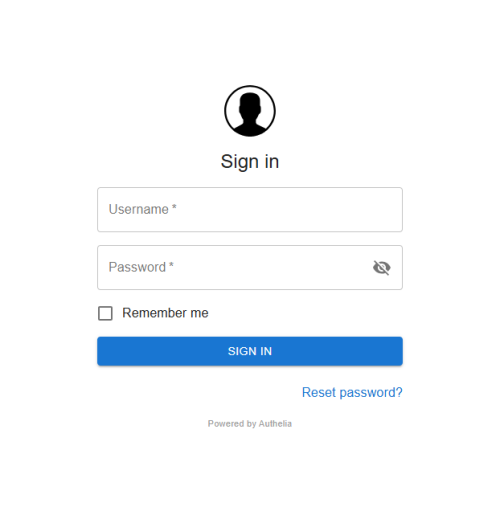
If you have configured OIDC authentication, you can select the Single Sign On option on the login page, which will redirect you to the OIDC provider’s login page (e.g., Authelia):
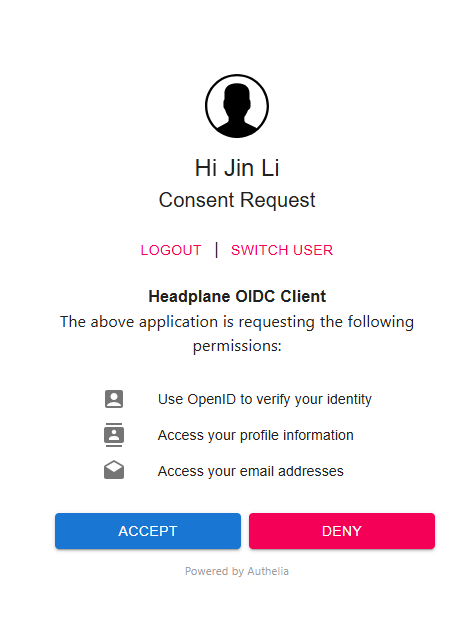
Then click the confirm authorization button:
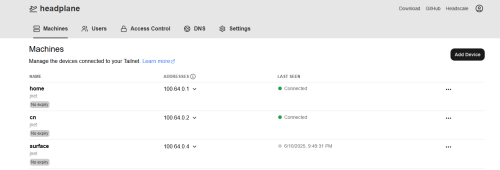
You will then see the Headplane management interface:
This interface is very similar to the Tailscale web interface, where you can manage your Headscale server, view connected devices, create pre-authentication keys, and more.
Tailscale clients by default connect to Tailscale’s official control servers, but we can configure them to connect to our own Headscale server. On macOS or Android, you can find the “Control Server” option in Tailscale settings and set it to your Headscale server address, such as https://<headscale.example.com>.
However, on Windows, I couldn’t find this option. We can set the Tailscale control server through the command line. Open Command Prompt or PowerShell and run the following command:
1
tailscale up --login-server https://<headscale.example.com>
If your Headscale service is running correctly and authentication is deployed, running the above command will output a URL link. Open this link in your browser, and you will see the authentication login interface. After logging in, you will see an authorization page; click the “Authorize” button, and the Tailscale client will connect to your Headscale server.
If you haven’t configured OIDC authentication, you can log in using a pre-authentication key. First, create a pre-authentication key in the Headscale container with the following command:
When using Nginx as a reverse proxy, you can check the Tailscale logs with the following command:
1
journalctl -u tailscaled -f
You might see output like this:
1
2
3
4
5
6
7
Apr 30 20:34:36 fedora tailscaled[1058]: control: LoginInteractive -> regen=trueApr 30 20:34:36 fedora tailscaled[1058]: control: doLogin(regen=true, hasUrl=false)Apr 30 20:34:36 fedora tailscaled[1058]: control: control server key from https://<headscale domain name>: ts2021=[lx/4O], legacy=Apr 30 20:34:36 fedora tailscaled[1058]: control: Generating a new nodekey.
Apr 30 20:34:36 fedora tailscaled[1058]: control: RegisterReq: onode=node=[W5uIA]fup=falsenks=falseApr 30 20:34:36 fedora tailscaled[1058]: control: controlhttp: forcing port 443 dial due to recent noise dial
Apr 30 20:34:46 fedora tailscaled[1058]: Received error: register request: Post "https://<headscale domain name>/machine/register": connection attempts aborted by context: context deadline exceeded
This indicates that Tailscale is timing out while trying to connect to Headscale. Then we check the logs of the Headscale Docker container. You can view the logs in Portainer or use the following command:
1
docker logs <headscale_container_name>
You might see the following warning message:
1
2025-04-30T21:45:45-04:00 WRN home/runner/work/headscale/headscale/hscontrol/noise.go:66 > No Upgrade header in TS2021 request. If headscale is behind a reverse proxy, make sure it is configured to pass WebSockets through.
Primarily, I thought this was just a warning. As we all know, programmers often overlook warnings, so I ignored this message for a long time. It wasn’t until I had checked all possible errors that I thought to search online for this warning. To my surprise, I found that this warning was the culprit preventing Tailscale from connecting to Headscale. I really wanted to curse the programmer who put such an important message in the warning category!
Anyway, this warning means that if Headscale is deployed behind a reverse proxy, you need to ensure that the reverse proxy is configured correctly to allow communication via WebSockets. Specifically, you need to add the Upgrade header in the reverse proxy configuration. If you are using Nginx as a reverse proxy, you can add the following content to your Nginx configuration file:
Make sure to replace <headscale_ip> and <headscale_port> with the actual IP address and port of your Headscale service.
If you are still having issues, check the Nginx error logs for any errors related to the proxy configuration. You can find the logs in /var/log/nginx/error.log.
2. Issues with Using Cloudflare Tunnel as a Reverse Proxy#
Before considering the use of a fixed IP, I had been trying to set up my Docker services through Cloudflare Tunnel for reverse proxying. For more details, refer to the following articles:
Therefore, when deploying Headscale, I also attempted to use Cloudflare Tunnel for reverse proxying. After configuring Cloudflare Tunnel as described in the previous articles, I found that the Headscale web interface (Headplane) could be accessed normally, but the Tailscale client could not connect to Headscale. The Tailscale login command would hang, and the Tailscale logs showed the following error:
1
2
3
4
5
6
7
Jun 24 15:29:02 fedora.attlocal.net tailscaled[885490]: Received error: register request: Post "https://headscale.example.com/machine/register": connection attempts aborted by context: context deadline exceeded
Jun 24 15:29:02 fedora.attlocal.net tailscaled[885490]: control: LoginInteractive -> regen=trueJun 24 15:29:02 fedora.attlocal.net tailscaled[885490]: control: doLogin(regen=true, hasUrl=false)Jun 24 15:29:02 fedora.attlocal.net tailscaled[885490]: control: control server key from https://headscale.example.com: ts2021=[lx/4O], legacy=Jun 24 15:29:02 fedora.attlocal.net tailscaled[885490]: control: Generating a new nodekey.
Jun 24 15:29:02 fedora.attlocal.net tailscaled[885490]: control: RegisterReq: onode=node=[yFWNe]fup=falsenks=falseJun 24 15:29:02 fedora.attlocal.net tailscaled[885490]: control: controlhttp: forcing port 443 dial due to recent noise dial
The Headscale container logs showed the following error:
1
2025-06-24T17:53:20Z WRN home/runner/work/headscale/headscale/hscontrol/noise.go:66 > No Upgrade header in TS2021 request. If headscale is behind a reverse proxy, make sure it is configured to pass WebSockets through.
I spent about a week or two trying various methods to resolve this issue, but ultimately I couldn’t find a solution.ChatGPT helped me analyze the cause of this issue, and it concluded that it was due to the limitations of the free version of Cloudflare Tunnel. The free version of Cloudflare Tunnel only supports proxying HTTP/1.1 (+WebSocket upgrades) and HTTP/2 + WebSocket traffic. However, the TS2021 Noise handshake used by Headscale is done over pure gRPC traffic in HTTP2, which cannot be proxied by the free version of Cloudflare Tunnel.
ChatGPT also mentioned that the paid version of Cloudflare Tunnel supports HTTP/3 and gRPC traffic, so if you have a paid Cloudflare account, you can try using the paid version of Tunnel for proxying. However, I ultimately decided to abandon this approach.
This issue has also been discussed in an issue on the Cloudflare Tunnel GitHub repository: General Upgrade header support #990. In summary, my current conclusion is that Cloudflare Tunnel cannot proxy Headscale services.
Private Virtual Network (VPN) Series -
This article is part of a series.