Motivation
In a previous article, I introduced several software solutions for sharing keyboard and mouse across multiple computers, including Barrier, InputLeap, and Deskflow. These tools greatly enhance the experience of working with multiple computers by allowing seamless sharing of keyboard and mouse input between Windows, macOS, and Linux systems. However, I discovered that the clipboard sharing feature is not available in Wayland environments. Unfortunately, my primary computer runs Fedora 42, which uses Wayland as its default graphical interface, preventing me from using the clipboard sharing functionality of Barrier, InputLeap, and Deskflow on this machine.
Later, I came across a mention of another cross-platform clipboard sharing software called ClipCascade in the Deskflow discussion forum. It was said that this third-party software could enable cross-system clipboard sharing and that it supports Wayland environments. I tried installing and using it, and I found that it indeed met my needs. Therefore, I would like to share the installation and usage methods for ClipCascade here.
For information on the installation and usage of Barrier/InputLeap/Deskflow, you can refer to my article: Installation and Usage of Free Cross-Platform Keyboard and Mouse Sharing Software Barrier/InputLeap/Deskflow.
Introduction
ClipCascade is a free and open-source cross-platform clipboard sharing software that supports sharing clipboard content between Windows, macOS, Linux, and Android systems. It supports Wayland environments, making it usable on newer Linux systems. Additionally, it allows users to set up their own servers, enhancing data transmission security.
Installation
Shared Clipboard Server
Before installing ClipCascade, we need to set up a shared clipboard server.
ClipCascade officially provides a public server that anyone can use, but the data will go through a third party. If you have high privacy requirements, it is recommended to set up your own server. Of course, when using the public server, you can also choose to encrypt the data transmission, so the security is still quite good. However, I have become accustomed to self-hosting various services, so I decided to set up my own ClipCascade server here.
Setting Up ClipCascade Server with Docker
ClipCascade officially provides a Docker image, so you can easily set up the server using Docker. I prefer to use Docker Compose to manage Docker containers, so I will also use Docker Compose to set up the ClipCascade server here. The required docker-compose.yml file is also provided in the ClipCascade GitHub repository, which you can refer to here. Below is the content of the docker-compose.yml file that I used:
|
|
Here, DATA_DIR and TZ are environment variables read from the .env file. DATA_DIR specifies the data storage directory for the ClipCascade server, and TZ specifies the time zone. You can modify these configurations according to your needs.
In addition, I specified the traefik-network network because I use Traefik as a reverse proxy server, and all services connect to this network. If you are not using Traefik, you can remove this part of the configuration.
Using Traefik to Reverse Proxy the ClipCascade Server
For information on reverse proxying Docker services, I have also introduced this in previous articles, which you can refer to:
- “Accessing Personal Websites from the Public Network - Nginx Reverse Proxy Configuration”
- “Accessing Personal Websites from the Public Network (2) - Traefik Reverse Proxy Configuration”
These two articles respectively introduce how to use Nginx and Traefik to reverse proxy Docker services. Here I continue to use Traefik to reverse proxy the ClipCascade server.
I use a dynamic configuration file to configure Traefik’s reverse proxy rules, creating a dynamic configuration file named clipcascade.yml, with the following content:
|
|
Starting the Service and Creating Users
-
Start the Docker Container
Navigate to the directory containing the
docker-compose.ymlfile and run the following command to start the ClipCascade server:1docker-compose up -d -
Reverse Proxy
If you are using the Traefik dynamic configuration file, Traefik will automatically load the configuration after the configuration file is created, and there is no need to restart Traefik.
If you are using Nginx as a reverse proxy, you need to restart the Nginx service:
1sudo systemctl restart nginx -
Login and Create Users
Open your browser and visit
http://clipcascade.example.com(replaceclipcascade.example.comwith your domain), and you will see the ClipCascade login page. By default, the admin account isadminand the password isadmin123. After logging in, you will see the following page: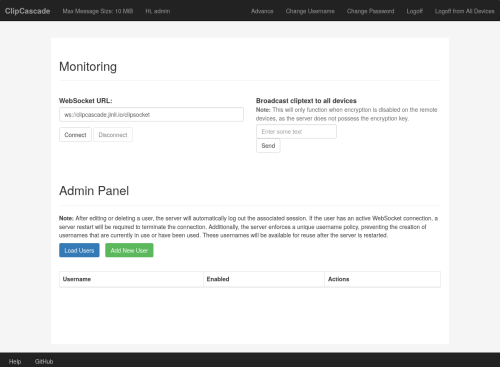
It is recommended that you click the “Change Password” link at the top to change the admin password immediately.
Then you can create a regular user account for daily use. Click the
Add New Userbutton in theAdmin Panel, enter the username and password, and then click theAdd Userbutton to create a new user.
Client Installation and Usage
ClipCascade supports multiple operating systems, including Windows, macOS, Linux, and Android. You can download and install the corresponding client for your system according to the documentation in the GitHub repository.
It is important to note that there are packaged installation files available for Windows, macOS, and Android systems, but for Linux systems, only the unbundled Python source code is available, and you need to resolve dependencies and run it yourself. Here, I will take Fedora 42 as an example to introduce the installation and usage of the ClipCascade client on Linux systems.
Installing ClipCascade Client on Fedora 42
-
Python Environment
ClipCascade client is written in Python, so you need to install the Python environment first. Fedora 42 comes with Python 3.12 by default, but some Python libraries that the ClipCascade client depends on are no longer supported in Python 3.12, so you need to install Python 3.11. I use
condato manage Python environments, so I created a Python 3.11 virtual environment with conda. You can refer to my article on Python Environment Management Summary for the advantages of using conda.1 2conda create -n clipcascade python=3.11 conda activate clipcascadeThen install the Python dependencies:
1pip3 install -r requirements.txt -
Installing Other Dependencies
In addition to the Python dependencies, you also need to install some system dependencies. You can install these according to the instructions in the ClipCascade GitHub repository:
1 2 3 4 5sudo dnf check-update sudo dnf install -y python3 python3-pip python3-gobject xclip wl-clipboard dunst sudo dnf install -y libappindicator-gtk3 sudo dnf install -y python3-xxhash python3-pyperclip python3-requests python3-websocket-client python3-pycryptodomex python3-tkinter python3-pystray python3-pyfiglet python3-beautifulsoup4 sudo dnf install -y ffmpeg ffmpeg-develIt is important to note that the installation instructions for ClipCascade mention that you also need to install
python3-plyerandpython3-aiortcusing DNF, but these two packages are no longer available in the official repository for Fedora 42. However, you don’t need to worry, because these two packages are already listed inrequirements.txt, and they have been installed when you installed the Python dependencies with pip.
The above two issues are not pointed out in the installation instructions in the ClipCascade GitHub repository, and I have already raised an issue with the author, hoping that they can update the installation instructions.
Running the Client
Navigate to the source directory of the ClipCascade client and run the following command to start the client:
|
|
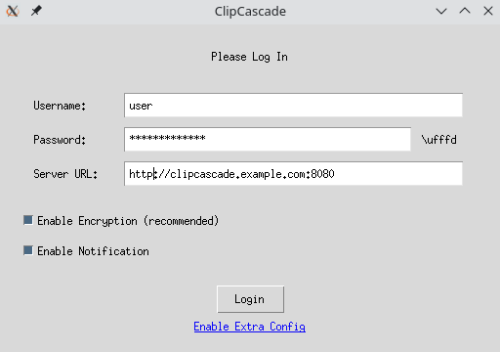
After starting, a window will pop up prompting you to enter the server address, username, and password:
Once logged in successfully, a notification will pop up, and you can share clipboard content with other devices logged into the same ClipCascade account.
(Bonus) Adding to the Start Menu
At this point, we can use the ClipCascade client on Fedora 42, but it’s still a bit cumbersome to open a terminal, navigate to the source directory, and run the python3 main.py command each time. We can add ClipCascade to the start menu so that it can be launched like other applications.
Linux desktop environments use .desktop files to manage applications in the start menu. I am using the KDE desktop environment on Fedora 42, and the start menu’s .desktop files are stored in the ~/.local/share/applications/ directory. We can create a file named clipcascade.desktop in this directory with the following content:
|
|
You need to replace the paths in the Exec and Icon fields with your own paths. The Exec field specifies the command to start the ClipCascade client, and here you need to specify the path to the Python interpreter and the main.py file. The Icon field specifies the path to the ClipCascade icon, and you can download the ClipCascade icon file and place it in an appropriate location.
It is important to note that the Python interpreter path in the Exec field needs to be specified as the path to the Python interpreter in the Python environment you used to install the ClipCascade client. If you used a conda-created virtual environment, you can run the which python3 command in the terminal to find out the path to the Python interpreter.
Installing ClipCascade Client on macOS
The installation of the ClipCascade client on macOS is relatively simple. You can directly download the packaged installation file and follow the instructions in the ClipCascade GitHub repository to install it. I followed the instructions step by step and did not encounter any additional issues.