Featured image of post 身份验证:使用Authelia搭建私有的身份验证服务

身份验证:使用Authelia搭建私有的身份验证服务

使用Authelia搭建私有的身份验证服务

缘起

之前一直觉得没必要自己搞一个身份验证服务,毕竟在自己部署的服务中,直接创建用户和密码就行了。但是最近准备搭建一个HeadScale(Tailscale的自托管版本)服务器,有几种方式搭建HeadScale的UI界面,但它们似乎都不支持直接创建用户和密码。

如果不使用身份验证的话,每次都必须输入API密钥,而密钥是一长串不规则的字符串,基本是没法记住的。如果使用身份验证服务,当然可以使用很多现成的身份验证服务,例如谷歌、苹果、微软、GitHub等都提供了身份验证服务。但既然都自建各种服务了,不妨也自建一个身份验证服务,将所有数据都掌握在自己手中。

身份验证服务的搭建方式有很多,例如使用Authentik、Keycloak、Authelia等。其中Authentik和Keycloak都是比较复杂的身份验证服务,功能也比较强大,但消耗的资源也比较多。我需要的身份验证服务比较简单,只需要能创建少量几个用户就行,所以我选择了Authelia。

Authelia简介

Authelia的特点

Authelia是一个开源的身份验证和单点登录(SSO)解决方案,支持多种身份验证方式,包括用户名和密码、双因素身份验证(2FA)、WebAuthn等。Authelia可以与多种身份验证后端集成,例如LDAP、Active Directory、MySQL、PostgreSQL等。它还支持多种身份验证协议,例如OAuth2、OpenID Connect、SAML等。

我在使用HeadScale时,主要需要的是使用OpenID Connect(OIDC)协议来进行身份验证。Authelia支持OpenID Connect协议,可以与HeadScale进行集成。

Authelia的主要特点包括:

  • 开源:Authelia是一个开源项目,可以自由使用和修改。
  • 多种身份验证方式:支持用户名和密码、双因素身份验证(2FA)、WebAuthn等多种身份验证方式。
  • 多种身份验证后端:支持LDAP、Active Directory、MySQL、PostgreSQL等多种身份验证后端。
  • 多种身份验证协议:支持OAuth2、OpenID Connect、SAML等多种身份验证协议。
  • 单点登录(SSO):支持单点登录,可以在多个应用之间共享身份验证信息。
  • 多种身份验证策略:支持多种身份验证策略,例如基于IP地址、基于时间等。

Authelia的不足之处是,它暂时没有提供图形化的管理界面,所有的配置都需要通过YAML文件进行配置。不过Authelia官方计划在未来的版本中提供一个管理界面(包括图形界面和命令行界面),详见Roadmap,期待一下。

Authelia的工作原理

Authelia只是一个身份验证服务,它本身并不提供任何应用程序或服务。它的工作原理是通过与其他应用程序或服务进行集成来实现身份验证。我在使用Authelia时,主要是将Authelia与Nginx进行集成。Nginx作为反向代理服务器,将用户的请求转发到Authelia进行身份验证,然后再将请求转发到实际的应用程序或服务。

通常,当用户访问一个网络应用程序时,其过程如下图所示:

无auth网络应用程序

即:

  1. 用户在浏览器上输入网络应用程序的URL,并通过HTTP或HTTPS请求访问到该应用程序的服务器。
  2. 服务器由Nginx处理请求,并将请求转发给相应的应用程序。
  3. 应用程序处理请求,并将响应返回给Nginx。
  4. Nginx将响应返回给用户的浏览器。

如果这个网络应用程序自带身份验证功能,那么在用户访问应用程序时,可能会弹出一个登录窗口,要求用户输入用户名和密码。如果验证成功,应用程序会将用户的身份信息存储在会话中,并允许用户访问应用程序的其他部分。

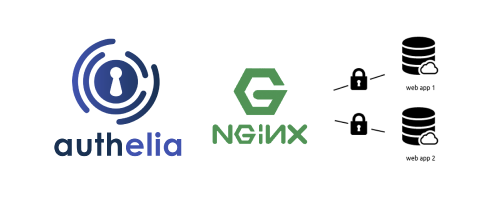
然而,有些网络应用程序并不自带身份验证功能,这时如果想要限制用户的访问权限,就可以通过添加一层身份验证服务来实现。Authelia就是这样一个身份验证服务。如果我们给某个网络应用程序添加了Authelia身份验证服务,那么用户访问该应用程序的过程如下图所示:

有auth网络应用程序

即:

  1. 用户在浏览器上输入网络应用程序的URL,并通过HTTP或HTTPS请求访问到该应用程序的服务器。
  2. 服务器由Nginx处理请求,并将请求转发给Authelia进行身份验证。
  3. Authelia验证用户的身份信息,
    • 如果验证成功,则将请求转发给Nginx。Nginx再将请求转发给相应的应用程序。应用程序处理请求,并将响应返回给Nginx。Nginx将响应返回给用户的浏览器。
    • 如果验证失败,则返回一个401 Unauthorized的响应,不会将请求转发给应用程序。用户无法访问应用程序的服务。

使用Docker部署Authelia

我们可以使用docker compose来部署authelia。我们需要准备一个docker-compose.yml文件和两个配置文件,结构如下:

1
2
3
4
5
6
authelia/
    ├── config
    │   ├── configuration.yml
    │   └── users.yml
    ├── .env
    └── docker-compose.yml

其中:

  • docker-compose.yml是docker compose的配置文件,定义了Authelia的服务、网络和卷等信息。
  • config目录下的configuration.yml是Authelia的配置文件,users.yml是用户的配置文件。
  • .env是环境变量文件,用于定义Authelia的环境变量。

docker-compose.yml

 1
 2
 3
 4
 5
 6
 7
 8
 9
10
11
12
13
14
15
16
17
18
19
20
21
22
version: '3.8'

services:
  authelia:
    image: authelia/authelia:4.39.3
    container_name: authelia
    restart: always
    volumes:
      - ./config:/config:ro
      - ${DATA_DIR}/data:/data
      - /etc/localtime:/etc/localtime:ro
      - /etc/timezone:/etc/timezone:ro
    ports:
      - "9091:9091"
    networks:
      - authnet
    labels:
      - wud.tag.include=^(\d+\.\d+)\.\d+$$ => $$1

networks:
  authnet:
    driver: bridge

其中${DATA_DIR}是一个环境变量,表示数据存储的目录。我们可以在.env文件中定义这个变量,例如:

1
DATA_DIR=/path/to/data

配置文件

Authelia的配置文件configuration.yml和用户配置文件users.yml可以参考官方文档进行配置。这里给出一个简单的示例:

configuration.yml

  1
  2
  3
  4
  5
  6
  7
  8
  9
 10
 11
 12
 13
 14
 15
 16
 17
 18
 19
 20
 21
 22
 23
 24
 25
 26
 27
 28
 29
 30
 31
 32
 33
 34
 35
 36
 37
 38
 39
 40
 41
 42
 43
 44
 45
 46
 47
 48
 49
 50
 51
 52
 53
 54
 55
 56
 57
 58
 59
 60
 61
 62
 63
 64
 65
 66
 67
 68
 69
 70
 71
 72
 73
 74
 75
 76
 77
 78
 79
 80
 81
 82
 83
 84
 85
 86
 87
 88
 89
 90
 91
 92
 93
 94
 95
 96
 97
 98
 99
100
101
102
103
104
105
106
107
108
109
110
111
112
113
114
115
116
117
118
119
120
121
122
123
124
125
126
127
128
129
130

###############################################################
#                   Authelia configuration                    #
###############################################################

server:
  address: tcp://0.0.0.0:9091/
  buffers:
    read: 4096
    write: 4096
  endpoints:
    enable_pprof: false
    enable_expvars: false
  disable_healthcheck: false

# https://www.authelia.com/configuration/miscellaneous/logging/
log:
  level: info
  format: text
  file_path: /data/authelia.log
  keep_stdout: true

# https://www.authelia.com/configuration/second-factor/time-based-one-time-password/
totp:
  issuer: authelia.com
  period: 30
  skew: 1

# AUTHELIA_DUO_PLACEHOLDER

# https://www.authelia.com/reference/guides/passwords/
authentication_backend:
  password_reset:
    disable: false
  refresh_interval: 5m
  file:
    path: /config/users.yml
    password:
      algorithm: argon2id
      iterations: 1
      salt_length: 16
      parallelism: 8
      memory: 256 # blocks this much of the RAM

# https://www.authelia.com/overview/authorization/access-control/
access_control:
  default_policy: deny
  rules:
    # - domain:
    #     - "*.example.com"
    #     - "example.com"
    #   policy: bypass
    #   networks: # bypass authentication for local networks
    #     - 10.0.0.0/8
    #     - 192.168.0.0/16
    #     - 172.16.0.0/12
    - domain:
        - "*.example.com"
        - "example.com"
      policy: one_factor

# https://www.authelia.com/configuration/session/introduction/
session:
  name: authelia_session
  same_site: lax
  expiration: 7h
  inactivity: 5m
  remember_me: 1M
  cookies:
    - domain: 'example.com'
      authelia_url: 'https://authelia.example.com'
      default_redirection_url: 'https://example.com'
  # AUTHELIA_REDIS_PLACEHOLDER

# https://www.authelia.com/configuration/security/regulation/
regulation:
  max_retries: 3
  find_time: 10m
  ban_time: 12h
  
# https://www.authelia.com/configuration/storage/introduction/
storage:
  # For local storage, uncomment lines below and comment out mysql. https://docs.authelia.com/configuration/storage/sqlite.html
  # This is good for the beginning. If you have a busy site then switch to other databases.
  encryption_key: 'some-secret-key-for-storage'
  local:
   path: /data/db.sqlite3

# https://www.authelia.com/configuration/notifications/introduction/
notifier:
  disable_startup_check: false
  # For testing purposes, notifications can be sent in a file. Be sure to map the volume in docker-compose.
  filesystem:
    filename: /data/notifications.txt

# https://www.authelia.com/configuration/identity-validation/introduction/
identity_validation:
  reset_password:
    jwt_secret: 'some-secret-key-for-reset-password'

# https://www.authelia.com/configuration/identity-providers/openid-connect/provider/
identity_providers:
  oidc:
    hmac_secret: 'hmac-secret-key'
    jwks: 
      -
        key_id: 'app-name'
        algorithm: 'RS256'
        use: sig
        key: |
          -----BEGIN PRIVATE KEY-----
          Your private key here
          -----END PRIVATE KEY-----          
    clients:
      - client_id: 'client-id'
        client_name: 'Description of the client'
        client_secret: 'client-secret'
        public: false
        authorization_policy: one_factor
        redirect_uris:
          - 'https://example.com/oidc/callback'
        scopes:
          - openid
          - profile
          - email
        grant_types:
          - authorization_code
        response_types:
          - code
        token_endpoint_auth_method: client_secret_post

这里在identity_providers中定义了一个OIDC身份验证提供者,如果有其他应用程序需要使用OIDC身份验证,就可以使用这个提供者。我们可以在clients中定义多个OIDC客户端,每个客户端都有一个client_idclient_secret,用于身份验证。

具体每个配置项的含义可以参见配置文件中注释的链接,这里不再赘述。

users.yml

1
2
3
4
5
6
7
users:
  user1:
    password: "hash-of-user1-password"
    displayname: "User One"
    email: [email protected]
    groups:
      - admins

这里定义了一个authelia用户,其用户名是user1,注意密码是经过哈希处理的密码,而不是明文密码。我们可以使用authelia提供的命令行工具来生成哈希密码,例如:

1
docker run authelia/authelia:4.39.3 authelia crypto hash generate bcrypt --password 'your-user1-password'

将生成的哈希密码替换到users.yml文件中即可。

其中的邮箱地址不重要,是不是真实的邮箱地址都可以。groups表示用户所属的组,Authelia支持多种组,例如adminsusers等。我们可以在配置文件中定义这些组,并为每个组分配不同的权限。

启动Authelia

做好以上准备工作后,我们就可以启动Authelia了。在authelia目录下执行以下命令:

1
docker compose up -d

这条命令会在后台启动Authelia服务,并将其绑定到9091端口。我们可以在浏览器中访问http://localhost:9091来查看Authelia的Web界面。

如果一切正常,我们应该能看到Authelia的登录界面。

Authelia登录界面

输入上面配置的用户名和密码,即user1your-user1-password,就可以登录了。注意,这里的密码是明文密码,而不是哈希密码。

登录成功后,我们会被重定向到上面配置的默认重定向URL,即https://example.com

Authelia与其他服务集成

上面提到了其他应用程序或服务可以与Authelia进行集成,以实现身份验证。这里以一个简单的Whoami应用程序为例,演示如何与Authelia进行集成。

Whoami应用程序

Whoami是一个简单的Web应用程序,它会返回请求的IP地址、请求头、请求方法等信息。我们可以使用Whoami来测试Authelia的身份验证功能。

  1. 部署Whoami应用程序

    我们可以使用docker compose来部署Whoami应用程序。我们需要准备一个docker-compose.yml文件,内容如下:

    1
    2
    3
    4
    5
    6
    7
    8
    
    version: '3.8'
    services:
      whoami:
        image: traefik/whoami:v1.11.0
        container_name: whoami
        restart: always
        ports:
          - "2001:80"
    
  2. 启动Whoami应用程序

    whoami目录下执行以下命令:

    1
    
    docker compose up -d
    

    这条命令会在后台启动Whoami服务,并将其绑定到8080端口。我们可以在浏览器中访问http://localhost:2001来查看Whoami的Web界面。

    如果一切正常,我们应该能看到Whoami的界面。

    Whoami界面

  3. 配置Nginx反向代理

    我们需要配置Nginx作为反向代理,将用户的请求转发到Authelia进行身份验证,然后再将请求转发到Whoami应用程序。

    我们需要准备一个Nginx的配置文件,内容如下:

     1
     2
     3
     4
     5
     6
     7
     8
     9
    10
    11
    12
    13
    14
    15
    16
    17
    18
    19
    20
    21
    22
    23
    24
    25
    26
    27
    28
    29
    30
    31
    32
    33
    34
    35
    36
    37
    38
    39
    40
    41
    42
    43
    44
    45
    46
    47
    48
    
    upstream <whoami.example.com> {  
        server 127.0.0.1:2001; 
    }
    
    server {
        listen 80;
        server_name  whoami.example.com;
        return 301 https://whoami.example.com$request_uri;
    }
    
    server {
        listen 443 ssl;
        server_name  whoami.example.com;
    
        # ssl 配置
        ssl_certificate     </path/to/fullchain.cer>;
        ssl_certificate_key </path/to/whoami.example.com.key>;
    
        # Step 1: internal location that calls Authelia for authentication
        location /authelia {
            internal;
            proxy_pass http://localhost:9091/api/verify;
            proxy_set_header Content-Length "";
            proxy_pass_request_body off;
            proxy_set_header X-Original-URL $scheme://$host$request_uri;
            proxy_set_header X-Real-IP $remote_addr;
            proxy_set_header X-Forwarded-For $proxy_add_x_forwarded_for;
            proxy_set_header X-Forwarded-Proto $scheme;
        }
    
        # Step 2: protect Whoami via Authelia
        location / {
            # This sends an internal subrequest to Authelia for verification
            auth_request /authelia;
    
            # Redirect to Authelia portal if unauthorized
            error_page 401 =302 https://<authelia.example.com>/?rd=https://$host$request_uri;
    
            proxy_pass http://whoami.example.com;
    
            proxy_set_header Host $http_host;
            proxy_set_header X-Real-IP $remote_addr;
            proxy_set_header X-Forwarded-Ssl on;
            proxy_set_header X-Forwarded-For $proxy_add_x_forwarded_for;
            proxy_set_header X-Forwarded-Proto $scheme;
            proxy_set_header X-Frame-Options SAMEORIGIN;
        }
    }
    

    这里的server_name需要替换为你自己的域名或IP地址。ssl_certificatessl_certificate_key需要替换为你自己的SSL证书和私钥的路径。

    然后重新加载Nginx配置:

    1
    
    sudo systemctl reload nginx
    

    根据上面Nginx的配置可以发现,用Authelia为Whoami验证用户身份的过程如下:

    1. 用户访问https://whoami.example.com,Nginx会根据auth_request指令将请求转发到/authelia,即Authelia进行身份验证。
    2. 接着这个验证请求会被转发到Authelia的/api/verify接口。
    3. Authelia会验证用户的身份,如果验证成功,则返回200 OK的响应,Nginx会将请求转发到Whoami应用程序。
    4. 如果验证失败,则返回401 Unauthorized的响应,Nginx会将请求重定向到Authelia的登录页面。

测试身份验证

现在我们可以在浏览器中访问http://example.com(替换为你自己的域名或IP地址)来测试身份验证功能了。

如果一切正常,我们应该能看到Authelia的登录界面: Authelia登录界面

输入用户名和密码后,登录成功后会被重定向到Whoami应用程序的界面。

如果输入错误的用户名或密码,则会提示“用户名或密码错误”,重新回到Authelia的登录界面。

总结

我们使用Authelia搭建了一个简单的身份验证服务,并以一个简单的Whoami应用程序为例,演示了如何与Authelia进行集成。如果想与其他已经部署的应用程序进行集成,只需要在Nginx中添加相应的配置即可。

comments powered by Disqus