Motivation
After about 5 years of building my own home server and using container technology to deploy various private services, I have become familiar with a solution that manages all containers using Docker Compose. This solution is elegant and useful, but it is limited to a single computer. Recently, I suddenly had the need to manage multiple computers, and I finally began to feel the necessity of transitioning from a single server to a server cluster, or what is known as a Homelab.
Specifically, the computer I previously used as a server had a relatively large amount of memory and hard disk space but did not have a graphics card, which was sufficient for many of the services I had deployed before. Now I have a computer with a graphics card and want to run some large language models. Of course, I could deploy them individually on this computer, but that would create a disconnect from my previous solution. I hope to find a solution that can manage both computers simultaneously, making it easier to expand when I add more computers in the future.
Of course, before transitioning to Kubernetes, it is best to have a good understanding of container concepts. I have previously written a series of articles on containers (mainly Docker) for reference:
- Container (2): Docker Best Practices Guide - Docker Compose and Portainer
- Container (3): Docker Best Practices Guide - Managing Data Volumes
- Container (4): Docker Best Practices Guide - Container Updates, Upgrades, and Migrations
- Container (5): Docker Best Practices Guide - Container Update Monitoring Tool WUD (What’s Up Docker)
- Container (6): Common Misconceptions, Bad Habits, and Issues When Using Docker
Homelab
What is a Homelab
On the surface, a Homelab refers to setting up a laboratory at home for learning, experimentation, and development. A Homelab typically includes one or more servers, networking equipment, storage devices, etc., which can be used to run various services and applications.
The scale of a Homelab can vary greatly. If you have sufficient financial resources, you can purchase multiple high-performance servers to build a large home lab. If your budget is limited, you can also use a regular computer or even a Raspberry Pi to set up a small home lab.
Why Do You Need a Homelab
Server clusters or Homelabs may seem distant from individual users, but this is not the case. I even believe that many people who play with private servers may gradually move towards a Homelab. Even if you don’t have multiple computers or servers, you can still try using Kubernetes (K8s) or K3s to manage your containerized applications. Later, if you acquire more computers or servers, you can easily expand your existing Kubernetes cluster to multiple machines.
In summary, a Homelab offers high flexibility and scalability to meet various needs of individual users. Even if you only have simple requirements and basic hardware, you can learn a lot of new technologies and knowledge by building a Homelab.
Kubernetes (K8s) and K3s
Kubernetes (K8s) is an open-source container orchestration platform for automating the deployment, scaling, and management of containerized applications. It is likely the most widely used solution for building a Homelab.
Of course, the knowledge within Kubernetes is quite complex, involving many concepts and components such as Pods, Services, Deployments, Ingress, etc. For beginners, it may seem overly complicated and somewhat difficult to understand. K3s is a lightweight version of Kubernetes, designed for resource-constrained environments. It removes some unnecessary components and features, making K3s easier to install and manage. K3s is well-suited for use in home labs or small clusters.
In this series of articles, we will start with a very simple application and use K3s to build a Kubernetes cluster from scratch, gradually expanding to more complex applications and multi-node setups.
K3s Basics
Kubernetes (K8s) is a complex system with many components. K3s simplifies this by retaining only the most essential components. Here, we will introduce only the core and fundamental concepts to provide a basic understanding of how K3s operates, with other components and concepts introduced as needed later.
The following diagram shows a basic framework example of K3s running on a single-node server:
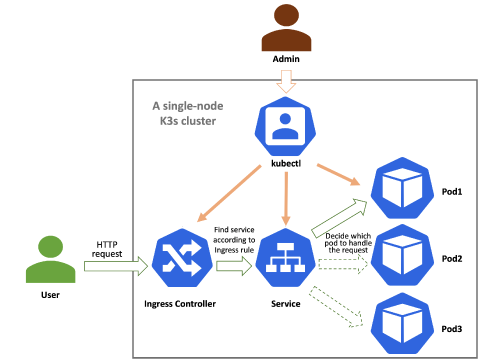
When a user makes a request to a service, the process is as follows:
- When an external user’s request reaches the K3s cluster, it is first handled by the Ingress Controller (usually Traefik).
- The Ingress Controller forwards the request to the appropriate Service based on the routing rules defined in the Ingress resource.
- The Service forwards the request to the corresponding Pod, where the actual application container is running.
Additionally, administrators can manage the components and resources within the K3s cluster using the command-line tool kubectl.
Next, let’s briefly introduce these concepts.
Pod
Pod is the smallest deployment unit in Kubernetes and can contain one or more containers. The containers in a Pod share network and storage resources. Pods are typically used to run a single application or service.
Service
Service is an abstract concept in Kubernetes used to define a set of access policies for Pods. A Service can be accessed through a fixed IP address and port, regardless of how the actual IP addresses of the Pods change. Services can be divided into ClusterIP, NodePort, LoadBalancer, and other types.
- ClusterIP: The default type, the Service can only be accessed from within the cluster.
- NodePort: The Service can be accessed from outside the cluster through a specified port.
- LoadBalancer: The Service can be accessed through a cloud provider’s load balancer.
Ingress and Ingress Controller
Ingress is a resource in Kubernetes used to manage routing rules for external access to services within the cluster. Ingress can route requests to different Services based on domain names or paths. Ingress is typically used in conjunction with an Ingress Controller, which is responsible for implementing the routing rules defined in the Ingress resource.
Deployment
Deployment is a controller in Kubernetes used to manage the deployment and updating of Pods. A Deployment can define the number of replicas of a Pod, update strategies, and more. With a Deployment, we can easily scale the number of Pods up or down, and perform rolling updates without affecting the availability of the service.
K3s Installation and Configuration
Next, let’s take a single-node cluster as an example to illustrate how to use K3s. We will then discuss how to expand the cluster when more nodes are added.
Here, we choose to deploy the simplest whoami service.
1. Install K3s
Installing K3s on a Linux server is very simple, just run the following command:
| |
After it finishes running, K3s should be installed successfully and you should see output similar to the following:
| |
This indicates that the command has done the following:
- Downloaded and installed K3s.
- Created symlinks for
kubectl,crictl, andctr, which are tools used to manage the K3s cluster. Among them:kubectlis the command-line tool for Kubernetes, used to manage Kubernetes clusters.crictlis the command-line tool for the Container Runtime Interface (CRI), used to manage containers.ctris the command-line tool for the container runtime, used to interact directly with the container runtime.
- Created
k3s-killall.shandk3s-uninstall.shscripts for stopping and uninstalling K3s.- Running the command
sudo /usr/local/bin/k3s-killall.shcan stop the K3s service. - Running the command
sudo /usr/local/bin/k3s-uninstall.shcan uninstall K3s.
- Running the command
- Created an environment file
/etc/systemd/system/k3s.service.envfor configuring the K3s service. - Created the K3s systemd service file
/etc/systemd/system/k3s.serviceand enabled the service. After that, the K3s service will start automatically every time the computer boots. - Started the K3s service.
2. Verify K3s Installation
After the installation is complete, K3s creates a configuration file named k3s.yaml in the /etc/rancher/k3s directory. This file contains the configuration information for the K3s cluster, including the API server address, authentication information, and more.
As mentioned above, K3s also installs a kubectl as the command-line tool for managing K3s. When kubectl runs, it needs to know which cluster it is managing based on the API server address and authentication information. By default, kubectl reads the configuration information from the /etc/rancher/k3s/k3s.yaml file. If you are not running kubectl as root, you may encounter permission issues when trying to read the /etc/rancher/k3s/k3s.yaml file. In this case, you can copy the /etc/rancher/k3s/k3s.yaml file to the ~/.kube directory and change the file permissions to allow kubectl to read the cluster information:
| |
Now you can use kubectl to manage the K3s cluster. You can run the following command to verify that K3s is installed successfully:
| |
If everything is working correctly, you should see output similar to the following:
| |
You can check the status of all Pods in the cluster by running:
| |
If everything is working correctly, you should see output similar to the following:
| |
This output shows that K3s has successfully started several Pods, including the DNS service (coredns), Traefik Ingress Controller (helm-install-traefik-crd and helm-install-traefik-qkl97), the default storage class for K3s (local-path-provisioner), and the Kubernetes metrics server (metrics-server).
3. Deploy a Simple Application (whoami)
Now we can deploy a simple whoami service to test the K3s cluster. whoami is a very simple HTTP service that returns the request’s IP address, request headers, and other information, making it ideal for testing the K3s cluster.
Create the whoami Application Manifest
K3s uses a YAML file called a manifest to define the deployment of applications. We can create a file named whoami.yaml with the following content:
| |
Although this is a YAML file, it actually contains three parts. For simplicity, we have placed these three parts in the same file. In later articles, we will explain how to better organize and manage applications in K3s by structuring files.
These three parts are separated by --- and define:
- Deployment: This defines a Deployment named
whoami, indicating that we want to deploy an application calledwhoami. This application has 1 replica and uses the official Traefik whoami image, listening on port 80. - Service: This defines a Service named
whoami, indicating that we want to create a service calledwhoami. This service is of type ClusterIP, meaning it can only be accessed from within the cluster. It listens on port 80 and forwards requests to the whoami container’s port 80 in the Pod. - Ingress: This defines an Ingress named
whoami-ingress, indicating that we want to create an Ingress resource calledwhoami-ingress. This Ingress uses Traefik as the Ingress Controller and routes requests to the Service namedwhoami.
Apply the whoami Service
Now we can use kubectl to apply this manifest file. Run the following command:
| |
If everything is working correctly, you should see output similar to the following:
| |
Verify the whoami Service
First, let’s confirm that the whoami service has been successfully deployed. Run the following command:
| |
If everything is working correctly, you should see output similar to the following:
| |
Then, let’s check the status of the Pods in the cluster. Run the following command:
| |
If everything is working correctly, you should see output similar to the following:
| |
Next, let’s confirm that the whoami service’s Service has been successfully created. Run the following command:
| |
If everything is working correctly, you should see output similar to the following:
| |
Access the whoami Service via Ingress
Now we can access the whoami service via Ingress. First, we can use the local address or the address within the same local area network to access the whoami service from the computer where whoami is deployed. If you are accessing it on your local machine, you can use the following command:
| |
If you are accessing it from another computer on the same local area network, you can use the following command (replace 192.168.1.233 with your K3s server’s IP address):
| |
Here, we added the Host header because Ingress needs this header to route the request to the corresponding Service. Otherwise, how would Ingress know which Service you want to access?
If everything is working correctly, you should see output similar to the following:
| |
If you can see output similar to the above, it means the whoami service is running successfully. However, note that the values of X-Forwarded-For and X-Real-Ip are 10.42.0.1 and 10.42.0.1, respectively. This is the internal IP address of the K3s cluster, not the IP address of the computer you are accessing from. This is because the Ingress Controller (Traefik) uses the internal IP address of the K3s cluster when forwarding requests to the whoami service.
TODO: How to fix this problem?
If you want to access the whoami service from outside the K3s cluster, you need to resolve the domain name whoami.example.com to the public IP address of your K3s server. Then you can access the whoami service through a browser or other HTTP clients.
If everything is working correctly, you should see something like the following in your browser:
| |
Conclusion
In this article, we introduced the basics of K3s and demonstrated how to deploy a simple whoami service on a single-node K3s cluster.
In the upcoming articles, we will continue to expand the K3s cluster, covering how to deploy more complex applications, manage multi-node clusters, and utilize other features of K3s to meet various needs.
Acknowledgments
I referenced the video From Zero to Hero: K3s, Traefik & Cloudflare Your Home Lab Powerhouse by YouTuber LinuxCloudHacks while learning how to use K3s.