Motivation
In order to access the websites and services I have set up on my personal server from the internet, my previous approach was:
- Use a Dynamic DNS (DDNS) service to bind my public IP address to a domain name.
- Then configure Nginx as a reverse proxy to point the domain name to the services on my server.
- Finally, use acme to obtain SSL certificates for HTTPS access.
Later, to containerize the reverse proxy, I switched to Traefik, which combined steps 2 and 3 into a more convenient solution. You can refer to my previous articles for these solutions:
- “Dynamic DNS - Cloudflare”.
- “Access Personal Website from Internet - Nginx Reverse Proxy Configuration”.
- “Access Personal Website from Internet (2) - Traefik Reverse Proxy Configuration”.
These solutions were already quite effective, but they still relied on the stability of the public IP address and the openness of ports. If deployed in a corporate or school network environment, you might encounter issues with unstable IP addresses or blocked ports. For a long time, I thought this problem was difficult to solve.
Recently, I finally discovered a better solution: using Cloudflare Tunnel. This solution allows you to access your services from the internet without a public IP address, even if ports are blocked or your network is restricted by a firewall.
Prerequisites
- A computer running a Linux system (as a personal server).
- A private domain name (for detailed operations, please refer to my previous post “Establishing a Personal Website (1): Purchasing a Personal Domain Name and Configuring Dynamic DNS”).
- Basic understanding of containerization concepts and experience with deploying services using Docker or Kubernetes (K8s or K3s).
- Basic understanding of reverse proxy concepts and usage. You can refer to “Access Personal Website from Internet - Nginx Reverse Proxy Configuration” or “Access Personal Website from Internet (2) - Traefik Reverse Proxy Configuration”, which provide detailed introductions.
- A Cloudflare account with your domain added to Cloudflare. If your domain was previously managed by another DNS service provider, you need to switch the domain’s DNS servers to those provided by Cloudflare. You can refer to “Migrating Domain Service Provider from Hostinger to Cloudflare” to learn how to migrate your domain to Cloudflare.
Basic Concepts of Cloudflare Tunnel
Introduction
Cloudflare Tunnel (formerly known as Argo Tunnel) is a service provided by Cloudflare that allows you to expose your services to the internet without a public IP address. It works by running a lightweight proxy program on your server that forwards your services through Cloudflare’s network, enabling access from the internet.
How It Works
The working principle of Cloudflare Tunnel can be found in the official documentation. In simple terms, as long as your computer can access Cloudflare’s DNS servers, you can establish a tunnel from Cloudflare to your computer. After configuring your domain to resolve to this tunnel, Cloudflare will forward all requests for your domain through this tunnel to the computer connected to it. Similarly, your services on the computer can send responses back through this tunnel. This allows you to access your services from the internet without needing a public IP address or open ports, regardless of whether your network is restricted by a firewall.
When a user accesses a service on the internet, the process is as follows:
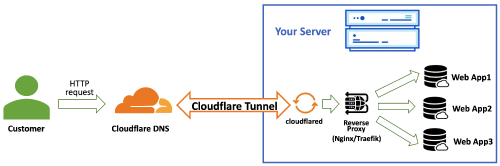
- The user enters your domain in their browser, which resolves to Cloudflare’s DNS servers.
- Cloudflare’s servers forward the request to the Cloudflare Tunnel you established. This tunnel
is maintained by the
cloudflaredprogram running on your computer. cloudflaredforwards the request to your configured reverse proxy service (such as Traefik or Nginx).- The reverse proxy service forwards the request to the specific service running on your computer (such as NextCloud, Jellyfin, etc.).
- The specific service processes the request and sends the response back through the reverse process to the user.
Using Cloudflare Tunnel
Enabling Cloudflare Zero Trust Service
Cloudflare Tunnel is part of the Cloudflare Zero Trust service, so you need to enable Cloudflare Zero Trust first.
Log in to your Cloudflare account, find “Zero Trust” in the left sidebar, and click to enter.
The first time you enable it, you will be prompted to choose a plan. The free plan is sufficient for personal users. Fill in your credit card information to enable it.
Creating a Tunnel
In the Zero Trust page, expand the left sidebar to find the Networks option, then click on Tunnels to open the Tunnels management page:
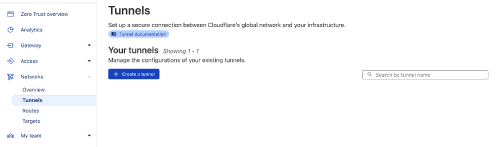
You can click the Create a tunnel button to create a new Tunnel, but it is not recommended to create it this way because you will need to transfer the configuration to your server later. Instead, we will create it directly on the server. The steps are as follows:
1. Install cloudflared on the Server
First, we need to install the cloudflared program on the server. cloudflared is a command-line tool provided by Cloudflare for creating and managing Cloudflare Tunnels. For specific installation methods, refer to the official documentation. Here are the basic installation commands:
| |
2. Create a Tunnel on the Server
After installing
cloudflared, we first need to log in to your Cloudflare account on the server by running:1cloudflared tunnel loginThis will output a link that you need to copy and open in your browser to log in to your Cloudflare account. After logging in, you will be prompted to select the domain you want to bind to the Tunnel.
Then, run the following command on the server to create a new Tunnel:
1cloudflared tunnel create my-tunnelReplace
my-tunnelwith the name you want to give to your Tunnel. After running this command, it will output a Tunnel ID, which you should note down.At the same time,
cloudflaredwill create a JSON file on your server that records this Tunnel, usually located in the~/.cloudflared/directory, with the filename being the Tunnel ID. This file is important as it contains the credentials needed to connect to this Tunnel.You can log in to the Cloudflare web interface to check if the Tunnel was created successfully. In the
Zero Trust -> Networks -> Tunnelspage, you should see the Tunnel you just created: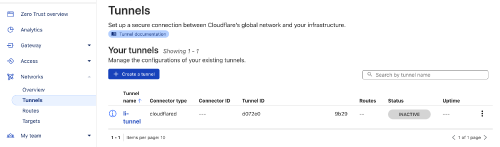
Note that at this point, we have only created the Tunnel but not connected it, so its status is
inactive.
3. Connect the Tunnel
Here, I will explain how to connect the Tunnel using both Docker and K3s as examples.
Docker
Prerequisites:
This assumes that you have already installed Docker and Docker Compose, are using Traefik as a reverse proxy, and have created a shared network for all containers named
traefik-net. For the specific process, refer to “Access Personal Website from Internet (2) - Traefik Reverse Proxy Configuration”.Create a cloudflared Container
Create a new directory for the cloudflared configuration files:
1mkdir -p ~/cloudflaredThen create a Docker Compose file
docker-compose.ymlin this directory with the following content:1 2 3 4 5 6 7 8 9 10 11 12 13 14 15version: '3.8' services: cloudflared: image: cloudflare/cloudflared:latest command: tunnel run my-tunnel restart: unless-stopped networks: - traefik-net volumes: - ~/.cloudflared:/etc/cloudflared networks: traefik-net: external: trueReplace
my-tunnelwith the name of your Tunnel. This configuration will create a cloudflared container that runs your Tunnel and connects it to thetraefik-netnetwork.Start the cloudflared Container
In the
~/cloudflareddirectory, run the following command to start the cloudflared container:1docker-compose up -dAt this point, you can go back to the
Zero Trust -> Networks -> Tunnelspage and see that the status of the Tunnel has changed toactive, indicating that the Tunnel is now connected: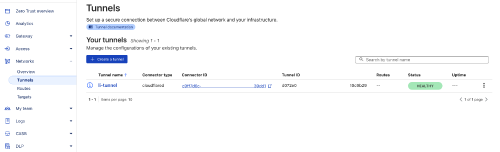
Configure DNS Records
Now that your Tunnel is active, you need to configure your DNS records to point to the Tunnel. Go back to the Cloudflare dashboard, and in the
Zero Trust -> Networks -> Tunnelspage, click on the Tunnel you just created.In the Tunnel details page, you will see a section for
DNS. Here, you can add a new DNS record that points to your Tunnel. For example, you can create a CNAME record formyapp.example.comthat points tomy-tunnel.cloudflare.com.After adding the DNS record, it may take a few minutes for the changes to propagate.
Test Access
Now you can access your service through the domain name you configured. For example, if you set up a service at
myapp.example.com, you can open this URL in your browser to access it.
K3s
Prerequisites:
This assumes that you have already installed K3s and are using Traefik as the Ingress Controller. For the specific process, refer to “Homelab (1): Building a Home Cluster with Kubernetes (K8s) or K3s”.
Convert Tunnel Credentials to Secret
When you created the Tunnel, Cloudflare generated a credentials file saved at
~/.cloudflared/<Tunnel ID>.json. We need to convert this file into a Kubernetes Secret.Run the following command on your server:
1kubectl create secret generic cloudflared-credentials --from-file=credentials.json=<User Home Path>/.cloudflared/<Tunnel ID>.jsonReplace
<User Home Path>with your user home directory path and<Tunnel ID>with the ID of the Tunnel you created earlier.Create cloudflared Deployment and Service
The required manifest file is as follows:
1 2 3 4 5 6 7 8 9 10 11 12 13 14 15 16 17 18 19 20 21 22 23 24 25 26 27 28 29 30 31 32 33 34 35 36 37 38 39 40 41 42 43 44 45 46 47 48 49 50 51 52 53 54 55 56 57 58 59 60 61apiVersion: apps/v1 kind: Deployment metadata: name: cloudflared spec: selector: matchLabels: app: cloudflared replicas: 1 template: metadata: labels: app: cloudflared spec: containers: - name: cloudflared image: cloudflare/cloudflared:2025.5.0 args: - tunnel - --config - /etc/cloudflared/config/config.yaml - run livenessProbe: httpGet: path: /ready port: 2000 failureThreshold: 1 initialDelaySeconds: 10 periodSeconds: 10 volumeMounts: - name: config mountPath: /etc/cloudflared/config readOnly: true - name: creds mountPath: /etc/cloudflared/creds readOnly: true volumes: - name: creds secret: secretName: li-tunnel-credentials - name: config configMap: name: cloudflared items: - key: config.yaml path: config.yaml --- apiVersion: v1 kind: ConfigMap metadata: name: cloudflared data: config.yaml: | tunnel: li-tunnel credentials-file: /etc/cloudflared/creds/credentials.json metrics: 0.0.0.0:2000 no-autoupdate: true ingress: - hostname: "*.jinli.li" service: http://traefik.kube-system.svc.cluster.local:80 - service: http_status:404The configurations in this manifest file are similar to those in the Docker Compose file, so I won’t elaborate on them here.
Deploy cloudflared
Save the above manifest file as
cloudflared.yaml, and then run the following command on your server to deploy cloudflared:1kubectl apply -f cloudflared.yamlAt this point, you can go to the
Zero Trust -> Networks -> Tunnelspage and see that the status of the Tunnel has changed toactive, indicating that the Tunnel is now connected successfully.If it doesn’t show as active, you need to check whether cloudflared was deployed successfully.
Configure DNS Records and Test Access
These two steps are the same as in the Docker method (steps 3 and 4 above).